Workgroups: Share and collaborate
Note
If you are a user who need access to a workgroup, check out Request membership of workgroups. If you need to set up and administrate a workgroup in ERDA, check out Create and administrate workgroup.
Workgroups include a shared folder where you can easily share files and collaborate with others from UCPH and/or external collaboration partners. Administrators can manage who has access, and there are no special restrictions on size or file types. All persons affiliated to UCPH as well as external partners can request access to a work group on ERDA (Request membership of workgroups). You can also see how to work in a workgroup in our How to work in a workgroup section.
Create and administrate workgroup
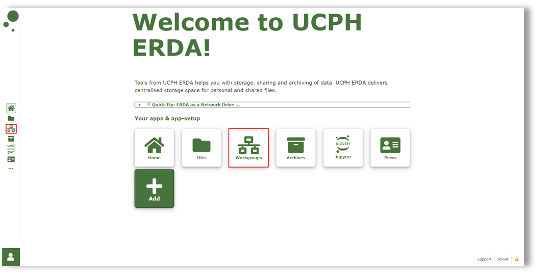
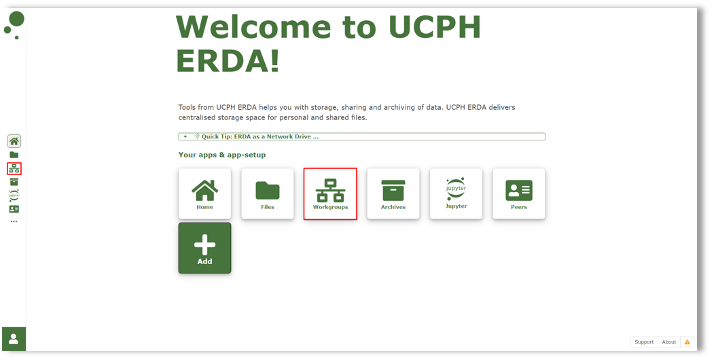
Click “Workgroups” on the front page of ERDA.
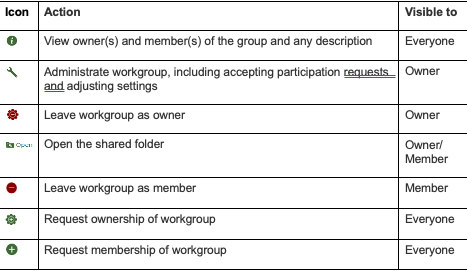
Under “Workgroups managed on this server”, you will see all existing workgroups. Next to each workgroup, there are several icons on which you can click. The icons vary depending on whether you are a owner, member, or can simply observe an existing workgroup. By holding the mouse marker over the icon, you can see what the icon means.
An overview of each icon:
Create workgroup
Create a new workgroup under “Additional Workgroups” at the bottom of the page. Write a short and apt title in the field, before clicking “Create Workgroup”.
Your new workgroup is then created with the title name, and you will enter a new page. From here, you can click the link “Administration for [name of your workgroup]”.
Clicking on the link leads you to the administrator page for your new workgroup
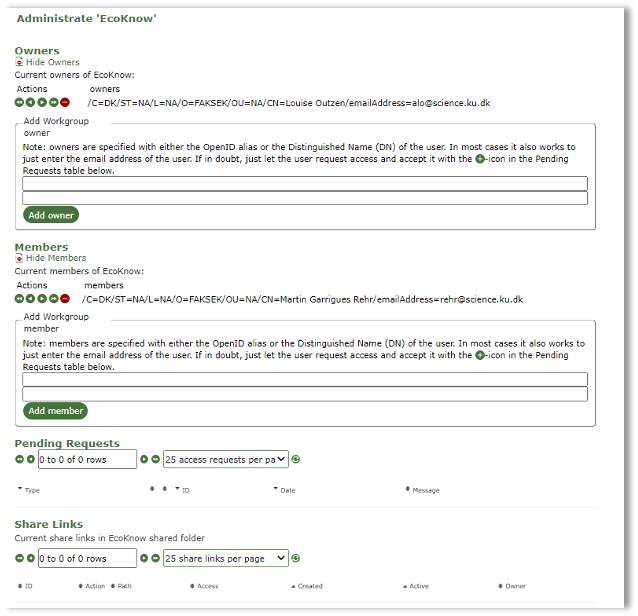
There you can invite co-owners or members to join your workgroup if you know their ERDA ID or the email with which they are registered.
As it may be difficult to know under which ID/email a user has been created, we recommend that you instead ask your internal or external collaboration partners to request membership themselves by clicking the “Request membership” icon (See Request membership of workgroups for more information).
We recommend that you ensure that there are at least two owners of your workgroup so that someone preserves access control in case either of you leave UCPH.
Accept request
When an intrernal or external collaboration partner requests to become a member of your workgroup, you will receive an email.
Click the first link in that email below the line “If you want to handle the member request please visit:” which will take you to the administrator page, where you find the membership request under “Pending Requests”.
Click on the plus icon next to “Member”, and click “Yes” in the pop-up window “Confirm” to accept the request.
You may write a short message to the person who has requested membership. Click “Inform user(s)”.
Your collaboration partner will now receive an email with the above message about access to your workgroup, and your short message should you have chosen to include one.
Administrate workgroup
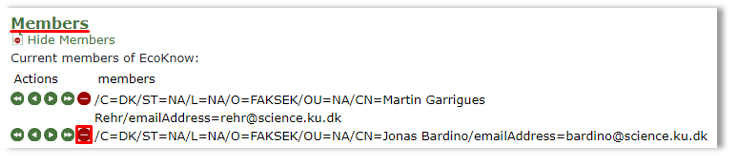
You can click the wrench icon to enter the administration page for your workgroup, where you can delete members and/or co-owners if they should no longer have access to the data shared in the workgroup. You simply need to find them on the list of members, and press the red icon next to the person who should no longer have access, and click “Yes” in the pop-up window Confirm.
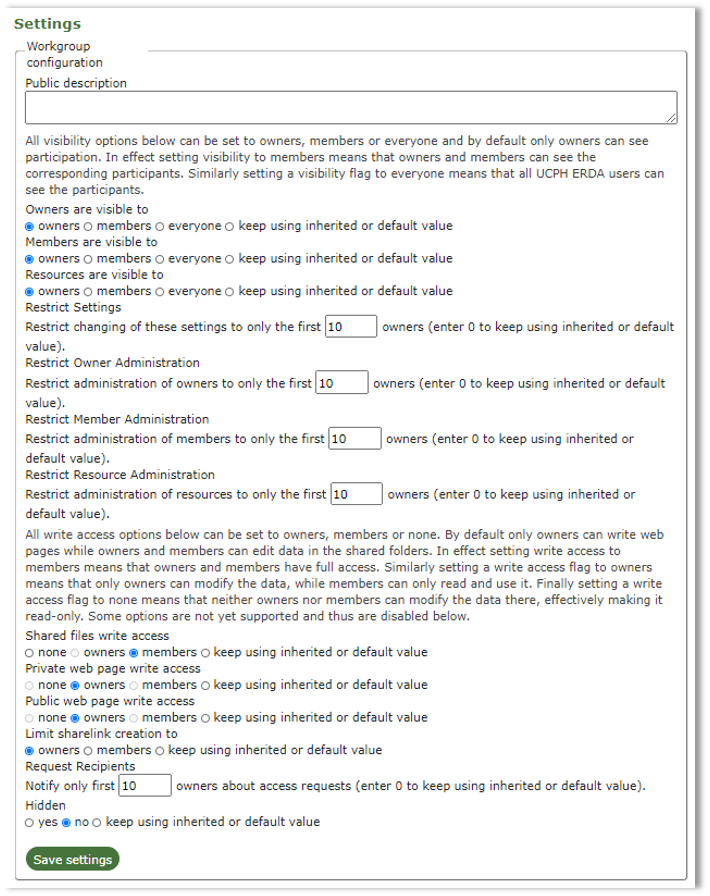
Prepare a brief description We recommend that you make a brief description of your workgroup under “Settings”, so that everyone can see (in addition to the short title) what your workgroup is about.
Write a short description of your workgroup under “Public description” in the Settings menu, and click “Save settings” once you are done.
In addition, you can also adjust various access restrictions under “Settings”, and, for example, establish read-only status for the shared data. You can assess which of the below options are relevant and click “Save settings” once you are happy with your changes.
Create sub-workgroup
It is possible to create sub-workgroups, so that the access control can be fine-tuned for parts of the overall workgroup.
Go to the “Additional Workgroups” field on the general workgroup front page. Write the name of your workgroup followed by “/” and the name of the sub-workgroup, and click “Create Workgroup”.

Your new sub-workgroup has now been created, and you will enter a new page. Click the link “Administration for [name of your workgroup]” to edit the sub-workgroup. All the members and owners of the original workgroup will automatically have access to the sub-workgroup, and you can invite completely new members and co-owners to the sub-workgroup, where those members will only have access to that sub-workgroup, and not the data in the primary workgroup. As such, it is a good tool for when you want to fine-tune who gets access to which data, and participation in these sub-workgroups is managed in the same way as all other workgroups (see Request membership of workgroups).
Request membership of workgroups
Regardless of whether you are affiliated with UCPH or an external collaboration partner, you can request access from the owner(s) of a workgroup.
Click “Workgroups” on the front page of ERDA as shown below.
Find the workgroup for which you want to request membership under “Workgroups managed on this server” and click the green plus icon next to the workgroup in question. Write a brief message to the owner of the workgroup about why you need access, and finish by clicking “Yes”. An email will be sent to the owner of the workgroup with your request.
You can also request access to a specific workgroup under “Request Access to workgroups”. Write the exact name of the workgroup (a distinction is made between upper and lower case letters), and select whether you want to be a member or an owner, and optionally write a brief message to the owner. Press “Request Workgroup access”.
You will typically receive an email when the owner has granted you access.
How to work in a workgroup
Upload file
In order to upload a file, you first have to go into the workgroup you want to upload it to by clicking “Open” on the workgroup, as shown below.

You are now in the workgroup’s shared folder, which all members and owners have full access.
Right-click to access the menu, where you have different options, shown below:
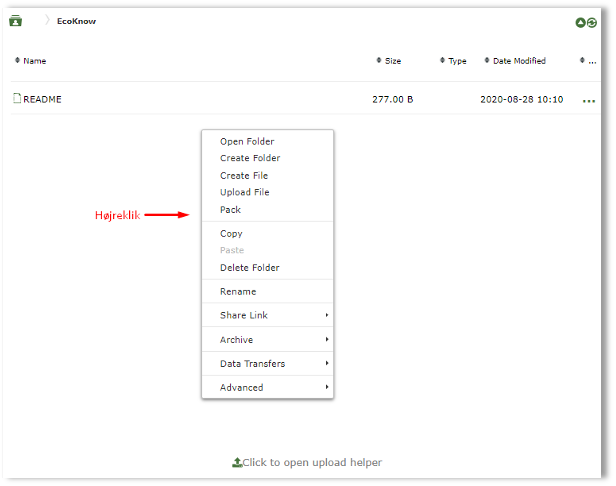
Click “Upload File” to upload a file to the folder, and click “Add files…” and select the file(s) you want to upload.
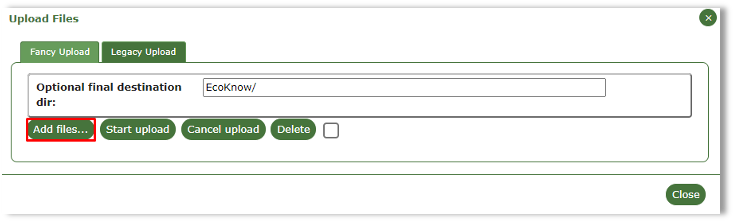
In the Upload Files menu, you can also drag and drop the file(s) you want to upload.
When you have finished selecting the file(s), you can either click “Start upload” next to the “Add files…” or click Start next to each file.
Click on the Close button once you are done.
Tip
If you want to transfer a folder structure with files, you can pack them in a zip or tar archive before uploading and then select “Unpack” on the uploaded archive file. However, it is typically easier to Connect ERDA as a Network Drive if you want to transfer or work on such structured data.