Setup SSHFS with SFTP on Windows
Install WinFsp and SSHFS-Win
On Windows, our recommended way of working with SFTP is through the SSHFS client.
Thus, you need to go to the linked GitHub page and install the two programs, either by following their installation guide in the GitHub, or by reading on here.
To install without Winget, you first click on the WinFsp link, and then click “DOWNLOAD WINFSP”. Follow their installation guide, before returning back to the sshfs-win GitHub page.
Click on either of the two buttons under Download, or click the link under the installation section, and pick either the x64 or x86 depending on your computer’s architecture.
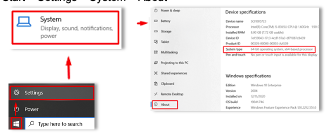
If you are unsure about your computer’s architecture, you can find it under Start -> Settings -> System -> About
When you are done installing both programs, you can connect a network drive.
Tips for installing on a UCPH computer
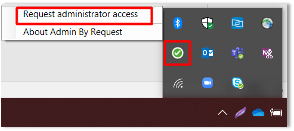
On a standard UCPH computer (B machine), you have access to installing programs by clicking “Request administrator access” in the bottom right corner.
If you have a special, secure UCPH computer (A machine), you need to contact UCPH IT to install the two programs.
Map Network Drive
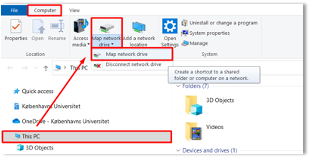
Click on the File Explorer icon on your computer and click on “This PC” on the side. On top, click on the “Computer” tab and click on the “Map network drive” at the top of the screen.
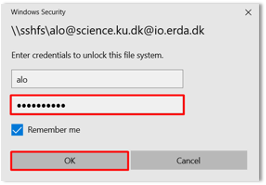
Next to “Folder”, paste the path from ERDA Setup page under “SSHFS/SFTP Network Drive”, where it follows the format “\sshfs<your-unique-identifier>”. Click on “Finish” once you are done.
This will open a login dialogue prompt if you chose password, and you will have to enter your UCPH name, and the password you chose for your SFTP access. Tick “Remember me” if you are using your own personal computer for ease of use, and click “OK”.
ERDA is now connected as a network drive with a chosen drive name, and you now have access to all your data in ERDA via your computer’s programs and file management! When you are online, you can work in the files in the same way as with your other local files, and any changes you make will be applied directly to the files in ERDA.
Tip
Every time you log into your computer, you need to click on the network drive to connect if you have previously ticked “Remember me”, and if not, you will need to enter your previously chosen password before it reconnects.
Disconnect Network Drive
You can disconnect ERDA as a network drive, and we recommend you do this if you share a computer with others.
Right click on the drive and click “Disconnect”.